From concept to 3d: a complete guide to modeling houses and landscapes
October 22, 2024
The modeling of landscapes and houses is a critical component of architectural visualization, allowing designers to create immersive representations that capture the essence of both structures and their surroundings. In the modern design landscape, effective integration between a building and its environment is vital for achieving a cohesive visual presentation. By skillfully blending architectural elements with their natural or urban contexts, architects can enhance the viewer’s understanding of how a structure will harmonize with its setting.
Getting started: tools and software for 3d landscape and house modeling
When it comes to creating stunning 3D models of landscapes and houses, 3ds Max stands out as one of the most powerful tools in the architectural visualization field. Renowned for its robust features and flexibility, 3ds Max is a go-to choice for many professionals in the industry. Here’s a closer look at how 3ds Max excels in this realm:
Modeling software overview
3ds Max is a comprehensive 3D modeling, animation, and rendering software developed by Autodesk. Its extensive capabilities make it ideal for creating intricate architectural designs, landscapes, and realistic visualizations.
Workflow integration
3ds Max is often used in conjunction with other software, such as AutoCAD for precise architectural drawings and layouts, or Revit for Building Information Modeling (BIM). This integration allows for a seamless workflow, where detailed plans can be imported into 3ds Max for visualization, ensuring that the final models are accurate representations of the original designs.
Learning resources
For those new to 3ds Max, numerous resources are available, including online tutorials, forums, and official documentation. The strong user community offers support and inspiration, making it easier to master the software and refine modeling techniques.
Rendering engines
V-Ray: Widely used in conjunction with SketchUp and Revit, V-Ray is a powerful tool for producing high-quality, photorealistic renders. Its advanced lighting and material settings allow for intricate detail and realism, making it a popular choice in architectural visualization.
Corona Renderer (our primary render engine): In our workflow, we rely on Corona Renderer for its simplicity and outstanding performance. Corona is known for its intuitive settings, allowing users to achieve photorealistic results without needing to dive into overly complex parameters. This makes it an ideal tool for architectural visualization, providing realistic lighting and material effects. Corona also stands out for its stability and speed, which is crucial for handling large-scale projects on tight deadlines.
Lumion: Lumion is renowned for its real-time rendering capabilities and is particularly useful for creating dynamic presentations. It’s a great solution for quickly visualizing architectural projects in various environments, especially in landscape architecture.
Enscape: Enscape offers real-time rendering features and integrates seamlessly with programs like Revit and SketchUp. It’s a user-friendly tool for generating virtual tours and presentations, making it valuable for showcasing projects to clients.
Twinmotion: Twinmotion, based on Unreal Engine technology, supports high-detail real-time rendering. Its fast and simple integration with software like SketchUp and ArchiCAD makes it an excellent choice for creating interactive presentations quickly.
Planning your 3D model: conceptualization and references
Effective planning is essential for successful 3D modeling. Here’s a structured approach to guide you through the conceptualization process:
Step 1: understanding the project scope
Defining the model’s purpose is critical in shaping your approach to the design. Consider whether the model will be used for conceptual design, client presentations, or photorealistic renders. Understanding the intended audience and objectives will inform your modeling style, level of detail, and overall presentation.
Step 2: gathering references and creating sketches
Collecting reference materials is an important step in the modeling process. Use reference photos, sketches, and site plans to inform your design decisions. Consider factors such as:
- Architectural style: Identify styles that resonate with the project and gather examples.
- Surrounding environment: Collect images of the site’s landscape, including flora, topography, and existing structures.
- Sketches: Create rough sketches to visualize layout, proportions, and design elements. This preliminary work will serve as a guide during modeling.
Step 3: setting up your scene
Defining the scale, dimensions, and orientation of the house and landscape is essential for accurate modeling.
- Scale and dimensions: Use real-world measurements to ensure your model is proportional and accurately reflects the intended design. This is crucial for both the house and the surrounding landscape features.
- Orientation: Consider the sun’s path, prevailing winds, and sight lines to determine the best orientation for your house. This not only affects aesthetic appeal but also impacts energy efficiency and natural lighting in the final design.
By following these steps, you’ll lay a strong foundation for your 3D modeling project, ensuring that your house and landscape design come together cohesively.
Building the foundation: basic modeling techniques for houses
Creating a compelling 3D model of a house begins with foundational techniques. Here’s a step-by-step guide to help you through the process:
Step 1: creating the basic structure
The initial step in house modeling involves constructing the essential components:
- Modeling walls: Start by defining the footprint of your house. Use simple geometric shapes to create walls, ensuring they are appropriately scaled. Utilize extrusion techniques to add height, and consider incorporating varying wall thicknesses for added realism.
- Roof construction: Choose the roof type that suits your design (e.g., gable, hip, flat). Use tools like the “roof” function in your modeling software to create sloped surfaces. Pay attention to overhangs and eaves, as these features add depth and character.
- Windows and doors: Model windows and doors separately, then cut them into the walls. This approach allows for accurate placement and alignment. Consider using pre-made window and door models for efficiency, but ensure they match the architectural style.
Step 2: adding architectural details
Incorporating architectural details can significantly enhance the realism of your model:
- Trims and molding: Add elements such as baseboards, crown molding, and window trims. These features provide visual interest and depth, breaking up flat surfaces.
- Textures and patterns: Introduce textures like brick, wood, or stucco to different surfaces. Use bump maps to add depth to flat surfaces, making materials appear more realistic.
- Small details: Don’t overlook the importance of smaller elements, such as railings, light fixtures, and hardware. These details contribute to the overall authenticity of your design.
Step 3: applying materials and textures
The choice of materials and textures is crucial for achieving a photorealistic appearance:
- Selecting materials: Choose materials that align with your architectural vision. Look for high-quality texture maps that reflect the properties of real-world materials. Consider factors such as reflectivity, glossiness, and bumpiness.
- Applying textures: Use UV mapping techniques to ensure textures fit properly on surfaces. Adjust scaling and orientation as needed to achieve a realistic look. Pay attention to the details, like aligning wood grain or brick patterns, to avoid inconsistencies.
- Material libraries: Utilize material libraries available in your software or online to streamline the process. These libraries often contain pre-configured materials optimized for rendering.
Modeling the landscape: from terrain to vegetation
A well-designed landscape complements your architectural model and enhances the overall presentation. Here’s how to effectively model the landscape:
Step 1: sculpting the terrain
Creating a realistic terrain is essential for establishing the environment around your house:
- Using terrain modeling tools: Start by defining the general shape of the terrain using elevation data. Use sculpting tools to create hills, slopes, and flat areas, ensuring that the transitions between different elevations are smooth and natural.
- Creating topographical features: Incorporate elements such as ponds, streams, or ridges to enhance the landscape’s visual appeal. Techniques like contour lines can help visualize elevation changes and guide your sculpting process.
Step 2: adding hardscape elements
Hardscape elements provide structure and functionality to your landscape design:
- Modeling pathways and driveways: Use simple geometric shapes to define pathways and driveways. Consider adding curves for a more organic look. Use texturing techniques to differentiate between materials like asphalt, concrete, or stone.
- Creating patios and decks: Design outdoor living spaces by modeling patios and decks. Use materials that match the architectural style of the house for cohesion.
- Integrating water features: If your design includes water features, model them carefully, paying attention to water depth and edge details. Adding reflections can significantly enhance realism.
Step 3: integrating vegetation
Vegetation is a key element in creating a lively landscape:
- Using asset libraries: Take advantage of libraries that provide pre-modeled trees, plants, and grass. Look for realistic models that match the climate and region of your project.
- Optimizing vegetation for rendering: Ensure that your vegetation models are optimized for performance. Reduce polygon counts where possible and use imposters for distant trees to maintain rendering speed without sacrificing visual quality.
- Distribution tools: Utilize tools like Forest Pack, MultiScatter, or Corona Scatter for efficient vegetation distribution. These tools enable random placement, scaling, and rotation for a natural, realistic look. Adjust density, variety, and size for a balanced landscape.
By following these steps for modeling houses and landscapes, you can create realistic and visually appealing 3D models that enhance your architectural visualizations.
Post-processing: enhancing your 3d model with final touches
Post-processing plays a vital role in elevating your 3D model, adding the final touches needed for a polished presentation:
Step 1: incorporating atmospheric effects
Adding atmospheric effects can bring your landscape to life:
- Fog and haze: Subtle fog can create depth and mystery, enhancing the three-dimensionality of your scene. Use gradient layers to simulate haze over distance.
- Clouds: Incorporate clouds into the background to create a dynamic sky. Utilize stock cloud images or create your own in Photoshop, adjusting opacity for a natural look.
Step 2: final checks and output
Before exporting your final render, ensure everything is in order:
- Reviewing the model: Conduct a thorough review of your model, checking for any inconsistencies in lighting, texture alignment, or geometry. Refinements can significantly enhance the final product.
- Exporting formats: Choose the appropriate file format for your finished render based on its intended use. Common formats include 3DS, FBX, or OBJ for 3D models.
Case studies: inspiring examples of house and landscape models
Examining successful examples can provide valuable insights into effective 3D modeling techniques. Here are a couple of inspiring projects:
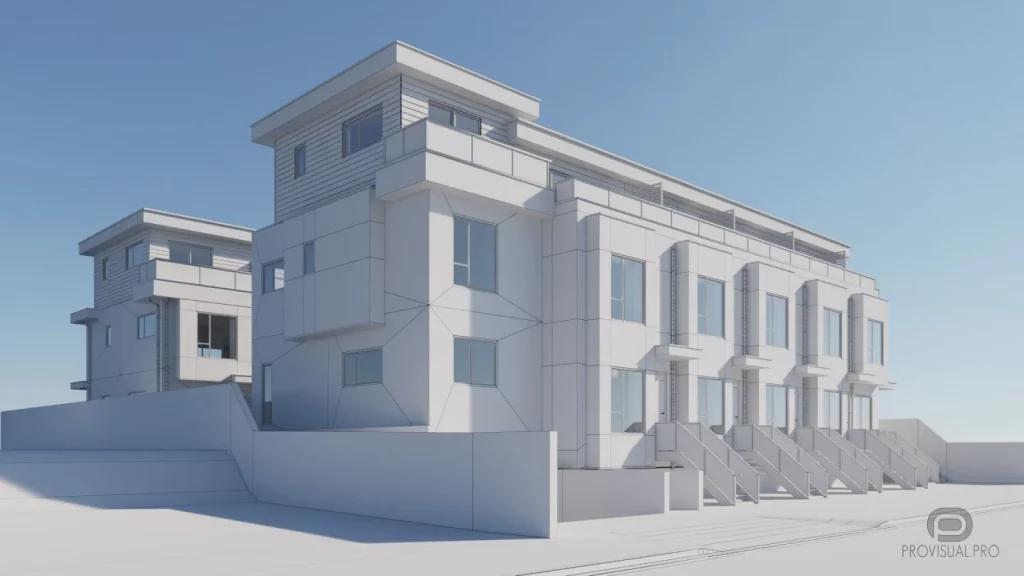
Case study 1: Modern row house
This structure appears to consist of modern, minimalist row houses or townhouses. Here’s how the design integrates key architectural and environmental elements:
- Lighting: The clean, linear design maximizes natural lighting through large windows. These windows are strategically placed to capture light while maintaining privacy for residents. The stepped arrangement of the facades ensures that light reaches different levels, enhancing the brightness in each unit.
- Materials: The use of smooth, light-colored materials, possibly concrete or plaster, reflects sunlight, keeping the building cool while also contributing to its sleek, contemporary look. The linear façade and modular construction enhance uniformity and reduce visual clutter.
- Composition: The building’s structure is staggered, which not only enhances aesthetics but also creates a rhythmic pattern, blending into the surrounding landscape without overwhelming it. The slight elevation through stairs adds to the transition from landscape to building, creating a smooth connection between the natural slope and the constructed environment.
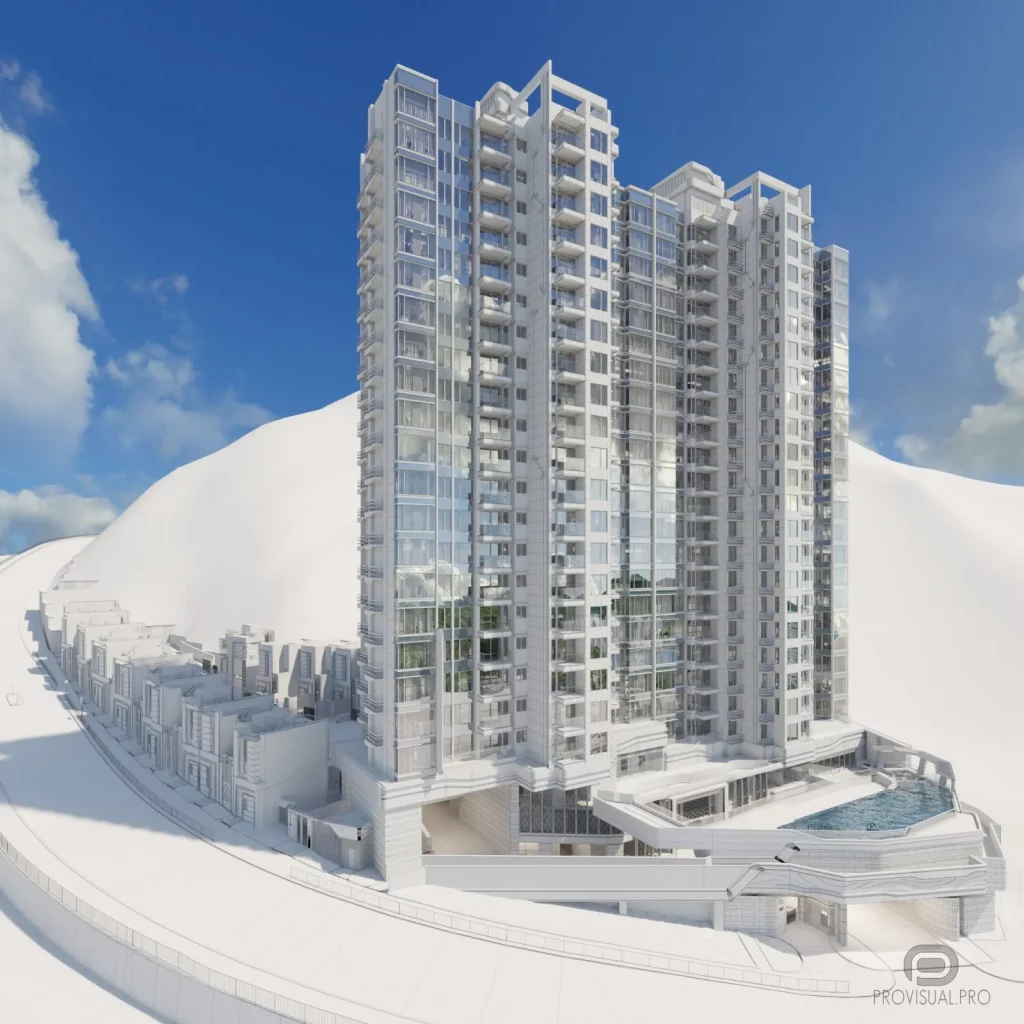
Case Study 2: High-rise residential complex
This high-rise complex is a vertical example of urban design and its integration with the landscape. Key aspects include:
- Lighting: The extensive use of glass in the façade ensures that natural light penetrates deep into the interiors. Glass reflects the surrounding sky and landscape, creating a visual harmony between the built and natural environments. The swimming pool and recreational areas receive ample light due to their open, exposed layout.
- Materials: A combination of glass and concrete creates a modern, transparent aesthetic that merges the structure with the sky. The light tone of the building material, coupled with the reflections from the glass, helps reduce the building’s visual mass, making it appear lighter and more connected to its environment.
- Composition: The layered, tiered design and the use of vertical lines complement the upward-growing landscape, while the pool and surrounding amenities at the base provide a transition zone between the built structure and the ground plane. This composition blends the building with the natural slope behind it, anchoring it to the landscape while preserving the connection to nature.


