Photomontage for exterior architecture: blending 3d models with real-life photography
October 22, 2024
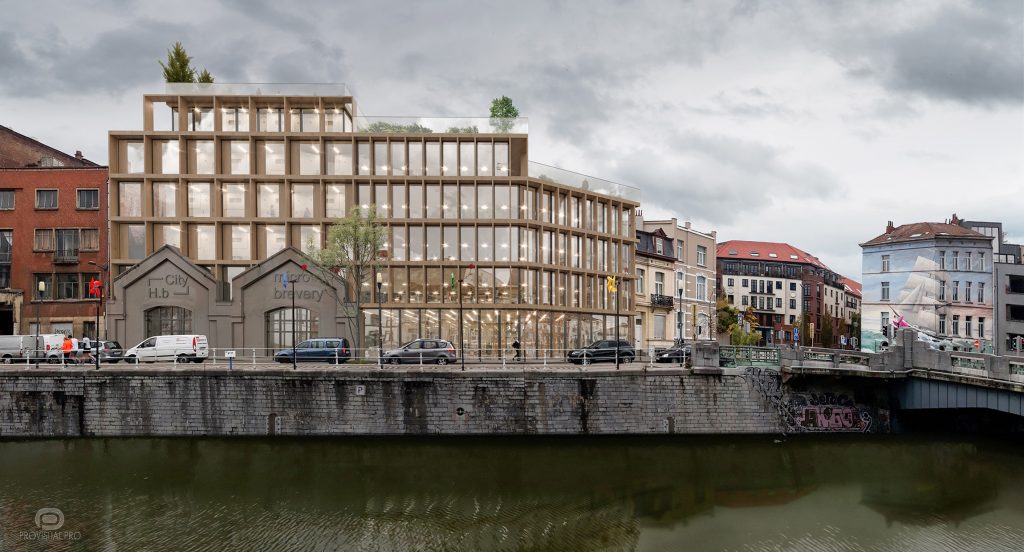
Photomontage of exteriors is a vital technique in architectural visualization, where 3D models are seamlessly integrated into real-life photographs. By blending digital architecture with actual environments, exterior photomontage offers a highly realistic representation of how a building will appear within its site context. This technique not only enhances the visual appeal of renderings but also ensures greater accuracy in showing how the design interacts with its surroundings. For architects and designers, exterior photomontages are crucial for creating impactful presentations, providing clients with a clear, lifelike vision of the final project.
Understanding photomontage in exterior architecture
Photomontage is a technique that merges 3D architectural models with real-life photographs, allowing designers to visualize how a proposed building will look within its actual surroundings. In exterior architectural rendering, photomontage plays a crucial role in providing a realistic and accurate depiction of a structure’s impact on its environment. By blending a digital model with a real-world site, architects can present the design in its intended context, showcasing how it interacts with nearby buildings, landscapes, and lighting conditions.
This approach helps clients, developers, and stakeholders better understand the scale, design, and aesthetic appeal of a building before construction begins. It’s particularly useful for urban planning, residential developments, and public spaces, where visualizing the relationship between the proposed architecture and the surrounding area is essential for decision-making.
Essential tools and software for exterior photomontage
3d modeling software
To create an accurate architectural model for photomontage, designers use 3D modeling tools like SketchUp, 3ds Max, and Rhino. Each offers different strengths:
- SketchUp: Known for its user-friendly interface, SketchUp is ideal for quick concept modeling and detailed architectural designs.
- 3ds Max: A more advanced tool, 3ds Max is widely used for creating high-precision models and is often preferred for large, complex projects. This is the software we use.
- Rhino: Favored for its flexibility in handling complex forms and organic shapes, Rhino is a top choice for designers seeking greater control over geometric details.
These programs are essential for generating the 3D architectural model that will later be inserted into a real-world image.
Rendering engines
At Provisual.pro Studio, we specialize in creating visualizations using Corona Renderer. This software is known for its user-friendly interface and its ability to produce highly realistic renders, particularly in handling natural light and material textures.
A brief overview of other popular rendering software:
- V-Ray: One of the most well-known rendering engines, valued for its high-quality output and precision in lighting and texture work. It’s often used for producing photorealistic visualizations.
- Lumion: Excels in real-time rendering, making it ideal for architects who need to quickly visualize their models in various lighting conditions and environments.
These tools are critical in ensuring the 3D model blends seamlessly with the background image for a convincing photomontage.
Image editing software
After the rendering process, software like Adobe Photoshop and Affinity Photo is used to integrate the 3D model into the background photo and make final adjustments. These programs allow designers to fine-tune the lighting, shadows, and colors to ensure the model fits perfectly into its surroundings.
- Adobe Photoshop: Photoshop is the industry standard for image editing, offering extensive tools for masking, blending, and color correction to ensure the model looks natural within the photograph.
- Affinity Photo: A powerful alternative to Photoshop, Affinity Photo provides many similar features at a lower cost, making it an attractive option for professionals looking for advanced editing capabilities.
These tools are essential for refining the photomontage, ensuring that the final image is polished, realistic, and ready for presentation.
Step-by-step guide to creating a photorealistic exterior photomontage
Step 1: preparing the 3d model and choosing the background image
Begin by preparing your 3D model and selecting a suitable background image.
- Matching scale and perspective: Ensure the 3D model’s scale aligns with the background photo by using reference points in the image. Utilize measurement tools in your 3D software to confirm accurate dimensions.
- Selecting the background image: Choose an image that complements the architectural design and reflects the surrounding environment. Consider lighting conditions and time of day to enhance the composition.
Step 2: setting up the camera angle and perspective
Aligning the camera angle in your 3D modeling software with the background image’s perspective is crucial for realism.
- Camera Alignment: Position the virtual camera to match the angle and height of the photograph. Use tools to ensure the field of view corresponds with the existing photo, creating a cohesive visual flow.
Step 3: lighting and shadow integration
Effective lighting and shadow integration enhances realism in your photomontage.
- Replicating natural and artificial lighting: Analyze the light sources in the background photo and replicate these conditions in your rendering software. Adjust the intensity and color temperature of light sources to ensure consistency.
- Shadow matching: Pay attention to the direction and softness of shadows in the photo, and adjust the shadows in your model accordingly. Techniques like shadow casting will help create realistic effects.
Step 4: compositing the image in post-production
The final step involves compositing the rendered model onto the background image.
- Layering techniques: Use image editing software, such as Photoshop, to layer the rendered model onto the background. Employ masking techniques to blend edges seamlessly, eliminating hard lines.
- Color grading and adjustments: Adjust colors and contrasts for harmony between the model and background. Use atmospheric effects, like light fog, to unify the elements and enhance realism.
Tips for achieving seamless integration in exterior photomontages
Matching textures and materials
Use realistic materials that reflect the local environment for a convincing photomontage. Ensure the textures of the 3D model align with nearby architecture and natural elements.
Color matching and grading
Harmonize colors and tones between the 3D model and background image. Utilize color correction tools to achieve a cohesive look, enhancing the visual impact.
Use of reflections and refractions
Simulate reflections and refractions for glass and water surfaces to achieve realism. Use reflection maps and refraction settings to match real-world appearances, elevating the quality of your photomontage.
Common challenges and how to overcome them
When creating an exterior photomontage, several common challenges may arise:
Mismatched lighting
One frequent issue is the mismatch between the lighting of the 3D model and the background photo. To address this, carefully analyze the light sources in the photograph. Adjust the intensity, color temperature, and direction of your virtual lights to ensure they replicate the conditions in the photo accurately.
Unnatural shadows
Unnatural shadows can make the model appear unrealistic. To refine shadows, pay attention to the direction and softness found in the background image. Use shadow settings in your rendering software to create soft, diffused shadows that match the environment. Consider adjusting the opacity and length of shadows to enhance realism.
Unrealistic textures
If textures on the 3D model don’t match those in the real-world photo, it can break the illusion of integration. Ensure you use high-quality, realistic textures that reflect the materials found in the surrounding environment. Adjust the scale and mapping of textures to achieve a more natural appearance.
Avoiding the “Floating” effect
To prevent the model from appearing as though it’s floating, establish clear contact points with the ground. Use shadows and elements like landscaping or nearby structures to anchor the model visually. Adding soft shadows that extend from the base of the model will help ground it within the scene.
Case studies: successful exterior photomontage projects
Project: Liège Competition II – Belgium (2022)
- Architect: A2M
- Location: Liège, Belgium
- Year: 2022
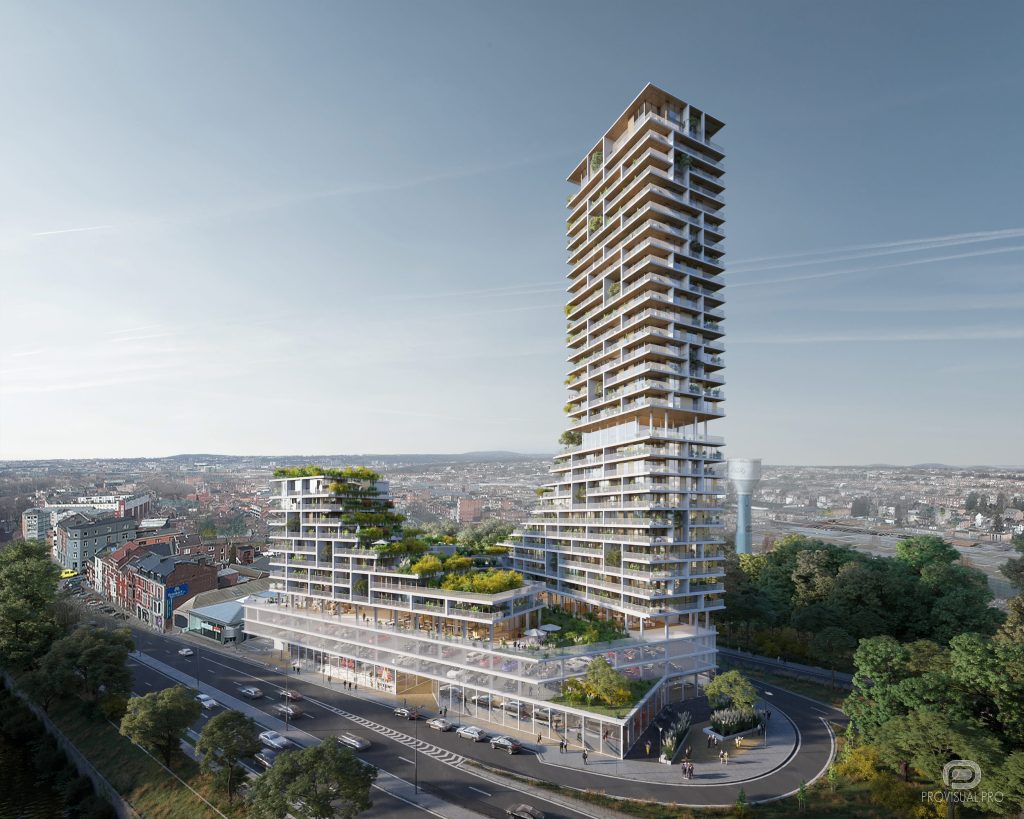
The Liège Competition II project is a concept for a multifunctional building, blending retail and residential spaces while emphasizing convenience and aesthetics. The 3D visualization by Provisual.pro Studio helped bring the architectural vision to life, allowing stakeholders to clearly understand how the building would be integrated into the urban environment of Liège.
Techniques and success factors:
- Layered functional spaces: The photomontage effectively captured the building’s multi-layered functionality, from the bustling retail spaces on the ground floor to the tranquil residential areas above. This visualization demonstrated how the structure would seamlessly balance commercial activity with residential privacy.
- Urban context: By accurately reflecting the surrounding buildings and urban landscape, the photomontage integrated the project into its environment. The architectural design was shown in a way that enhanced the streetscape, contributing to a lively and cohesive urban setting.
- Lighting and atmosphere: The use of natural lighting and environmental elements helped ground the structure within a real-world context. The sunlit retail areas and cozy evening ambiance on the rooftop lounge provided a dynamic portrayal of how the building would appear at different times of day.
Why it was successful:
The photomontage successfully illustrated the project’s vision by combining technical precision with an engaging portrayal of daily life in the building. The visualization not only demonstrated the architectural design but also captured the atmosphere the architects aimed to create—an active yet harmonious space in the heart of Liège.
Project: Victory – Toronto, Canada (2022)
- Architect: Canadian Architectural Bureau
- Location: Toronto, Canada
- Year: 2022
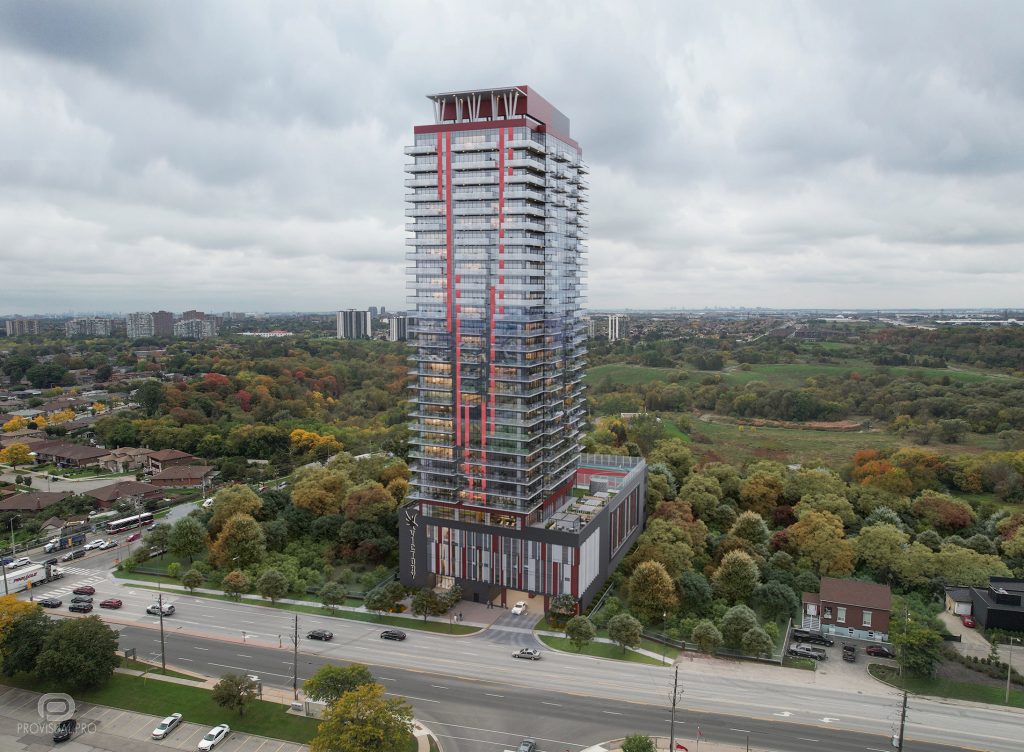
The Victory project is a 30-storey residential building with extensive amenities, located in Toronto. In addition to the residential spaces, the building features a community barbecue terrace, gym, children’s playground, sauna, and billiards. Provisual.pro Studio provided exterior visualizations, including animation and drone video integration, offering a highly detailed and dynamic presentation of the project.
For this project, the focus of the static photomontages was on showcasing the architecture through realistic textures and materials. Key aspects include:
- Realistic materials and texturing: The renders utilized high-quality textures to emphasize the building’s modern glass façade. This helped accurately convey reflections and details of the glass surfaces, creating a sense of depth and transparency. It was crucial to depict material transitions, such as from glass to concrete, to give the viewer a tangible sense of these textural differences.
- Photomontage integration into real environment: The renders were seamlessly integrated into real-world photographs of the surrounding landscape, enhancing the sense of the building’s presence in its actual urban context. This helped create believable scenes and improved the perception of the architecture against the real-world environment.
- Lighting and reflection effects: Lighting and shadows played a crucial role in creating a volumetric and natural atmosphere in the renders. Reflections on glass surfaces highlighted the building’s modern aesthetic, while appropriate use of sunlight made the renders as realistic as possible.
Why it was successful:
The integration of drone video and high-detail exterior renderings elevated the realism of the Victory project visualization. By blending real-life footage with CGI, the final presentation was immersive, helping stakeholders visualize the building’s impact on the skyline and its appeal to future residents. This dynamic approach sets the project apart by conveying both the architecture and the experience of living in such a space.
Conclusion
Using photomontage in architectural presentations offers numerous benefits, including enhanced visualization of projects within real-world contexts. This technique helps stakeholders grasp the design’s impact on the environment, making it invaluable for presentations.
For architects and designers looking to achieve the highest level of photorealism and seamless integration in their renderings, partnering with professionals can make all the difference. Provisual.pro Studio specializes in creating high-quality 3D visualizations and photomontages that bring your architectural projects to life. Our team is skilled in capturing the nuances of lighting, shadows, and textures to ensure that every rendering is both realistic and compelling.
At Provisual.pro Studio , we prioritize attention to detail and use the latest technology to create renderings that effectively communicate your design intentions. Our experience in delivering projects across various sectors ensures that we can tailor our services to meet your specific needs. Whether you’re presenting to clients, stakeholders, or planning boards, our high-quality 3D renderings will elevate the impact of your presentation.
By choosing Provisual.pro Studio , you can focus on your core design work, while we handle the technical aspects of visualization, providing you with stunning, photorealistic images that resonate with your audience.


